Invoice Plane: mPDF taking a long time to generate pdf files remotely

I had an issue where if I was using my outside domain address to connect to the web server it would take roughly 4 minutes to generate a PDF after googling for what seemed like an eternity I saw something that caught my eye in a random discussion about mPDF not related to invoice plane.

So, firstly PDF’s generate fine when using a local address eg http://192.168.10.2/iplane but if i connected to it using wagex.org/iplane it would take minutes to generate a PDF or send an email with PDF attached.

SOLUTION: enable SSL on the web server and connect using https, yes its that simple that solved my issues all together.

dumb short topic i know, but holy cow it took me forever to find that fix and it had nothing to do with invoice plane so hopefully someone having the same issue finds this and it helps.

Thank you for reading!

Current Server Setup 2/18/2018

Man its changing quickly figured it deserved another post since I’ve added another server into the mix to handle the video camera recording. Reason being using Intel Quicksink on the newer Intel cpu’s takes a huge load off of the cpu and saves a ton in power consumption, also I wanted to learn how Active Directory and Domain Controllers worked.

Server 1:

The OG server is running server 2012 r2 Datacenter with hyper-v for the virtual machines.
For main storage there is an array of 5x 2TB hitachi drives in Raid 5. contacam has its own 1tb blue. There is a 2tb WD green I use to offload raw footage from my cameras onto, finally the operating system with the rest of the vm disks are on a WD Blue 1TB SSD

Continue reading “Current Server Setup 2/18/2018”

Setting up Transmission and OpenVPN on Debian using only CLI, with auto start and VPN up check script. Private Internet Access

To begin, lets start with installing Transmission and OpenVPN.
To install Transmission

sudo apt install transmission-daemon

Once it is installed you will want to access the web GUI from another machine so lets go into the settings.json and tweak a few things so you can access it. 

First we need to stop transmission 

sudo service transmission-daemon stop

Then with your favorite editor go ahead and open the settings file, I prefer nano so 

nano /etc/transmission-daemon/settings.json

We need to just change a couple lines, where I have 192.168.10.* type your lan range be it 192.161.* or 192.168.0.* the * is a wildcard that will let anyone on your lan access the transmission web-GUI.

“rpc-authentication-required”: false,
“rpc-bind-address”: “0.0.0.0”,
“rpc-enabled”: true,
“rpc-whitelist”: “192.168.10.*”,

Continue reading “Setting up Transmission and OpenVPN on Debian using only CLI, with auto start and VPN up check script. Private Internet Access”

Current Server Setup 11/1/2018

The server has changed in many ways since its first build with an old 775 socket celeron and 2gb of ram, to a dual xeon 771 setup, to a dual 6 coreopteron with 32gb of ram, back to a xeon 771 with 32gb of ram, and now its an i3-2120 i5-2400 with 16gb of ddr3 ram.

The server is running server 2012 r2 Datacenter with hyper-v for the virtual machines. here is a quick rundown of the virtual machines.

For main storage there is an array of 5x 2TB hitachi drives in Raid 5. contacam has its own 1tb blue, lancache has its own 300GB 10k velociraptor, there is a 500GB seagate I keep images of most of the vm’s on. finally the operating system with the rest of the vm disks are on a samsung 250GB samsung SSD.

Contacam: Running windows 10 ltsb and contacam software to manage my home security cameras. [4 cores 1GB-4GB dynamic meory]  
switched from contacam to motioneye in a docker, much less resources pretty cool webgui overall better imo.

switched from contacam to motioneye in a docker, much less resources pretty cool webgui overall better imo.

Continue reading “Current Server Setup 11/1/2018”

Current Server Setup

The server has changed in many ways since its first build with an old 775 socket celeron and 2gb of ram, to a dual xeon 771 setup, to a dual 6 coreopteron with 32gb of ram, back to a xeon 771 with 32gb of ram, and now its an i3-2120 i5-2400 with 16gb of ddr3 ram.

The server is running server 2012 r2 Datacenter with hyper-v for the virtual machines. here is a quick rundown of the virtual machines.

For main storage there is an array of 5x 2TB hitachi drives in Raid 5. contacam has its own 1tb blue, lancache has its own 300GB 10k velociraptor, there is a 500GB seagate i keep images of most of the vm’s on. finally the operating system with the rest of the vm disks are on a samsung 250GB samsung SSD.

Contacam: Running windows 10 ltsb and contacam software to manage my home security cameras. [4 cores 1GB-4GB dynamic meory]

Docker host debian: running docker + cockpit for docker management. Below is a list of currently running dockers. [4 cores 4GB static memory]

  • Keepass: to hold my passwords for everything im getting old and have a hard time remembering everything
  • Plex Server: basically only use this to stream music to work, and to give my dad access to my movie / tv show libraries at his house.
  • Teamspeak 3 server: i was running a vm just for this moving it to a docker was kind of a learning experience but it works great even was able to transfer all my stuff from my windows install into it with a little tweaking. That server had been running since 2013 so i have alot of config into it didnt wanna lose that.
  • ubooquity: I recently tookup an interest in reading comics this utility is nice for both remote and local viewing of comics, really cool to browse it on the tv using fire tv 
  • Jackett: gives extra indexers for radarr, sonarr, and lidarr on my download server.. i ran it in there but jackett and windows didnt seem to get along well at all and constantly crashed.

Download Server: Running utorrent pro, radarr, sonarr, and lidarr to manage my movie, music, and tv show libraries does its job.. most of the time lol. [4 cores 1GB-4GBdynamic memory]

Lamp Stack: Running Turnkey’s Lamp stack iso, most amazing people saves so much repetitive work. runs my word press site, my invoicing software (simple invoices), and a few misc web utilities. [2 cores 768MB ram]

lancache: Running NGINX in CENTOS 7 based off of multiplays lancache it caches steam and origin downloads so when its accessed a second time (i have two gaming pc’s) the second download is as fast as it can push over gigabit (or read from disk in my case hope to get this on an SSD eventually). [4 cores 1GB-2GB dynamic memory]

Pi-hole: Running Debian and pi-hole dns server this gives network wide ad blocking, works like a charm. I did try this in a docker and it seemed unstable so i reverted back to its own vm. [512MB ram 1 core]

pfsense + pi-hole + dns resolver (unbound) working with dns redirects.

Recently i switched my home network ad blocking software from dnsbl(pfblockerng) to pi-hole because the gui is so much nicer and easier to work with and see what all is going on. so when i changed my dns server in pfsense over to the new pi-hole server it basically bypassed all my dns redirects i had setup in unbound (dns resolver), so after some searching i found an option in unbound services>dns resolver “DNS query forwarding, check the box “enable forwarding mode” and that will make unbound the primary dns which retrieves its resolutions from pi-hole.

The downside to this setup is pi-hole shows all requests from 192.168.10.1 (aka my router) instead of the individual devices, but it was the only way to make it work with my lancache server which relies on the redirects from unbound.

hopefully i can tinker with it and find a workaround for that later but for now it works. Thanks for reading!

!

How to hook up your own wifi garage door opener.

I was looking at garage door openers for my new pole barn and kept seeing they wanted like $100 for the wifi modules for all these units…. now im sure they all are a little smarter and more sophisticated like logging door openings and giving and open or close status.. if you want all that probably best off buying one of their units, if you just wanna be able to open it from anywhere or without a garage clicker in your car or with alexa or google, this will get er done.

my garage door has one of the new fangled opener buttons that has like 3 buttons “learn, light, open” so it’s not just shorting the two wires out like some of the older ones.. if you have one of the older ones you can just put this in parallel to your current button and it will function without any soldering.

firstly here is a list of items needed to complete the project.

  • soldering iron and solder
  • small 20-24 gauge wire
  • phillips head screwdriver
  • momentary wifi switch module this is what i bought.
  • multimeter
  • 12v power supply
  • project box that will fit the wifi module

to start first take your button off the wall and remove the wires from the back by loosening the two screws holding them to the pcb, and go ahead and take those screws the rest of the way out, on mine they were the only thing holding the pcb in besides friction, so now we just need to pop the pcb out of the plastic housing gently.

once the pcb is out of the housing go ahead and look for the button that is pressed when you hit the “open button” usually its gonna be an smb mounted tactile switch, now you are going to want to use a multimeter and see which terminals are normally open and normally closed  you’re gonna want to go with two of them that are normally open with infinite resistance, after the pair you want to use have been identified you need to solder the 24g leads to the board, the other end of the leads will go into the NO and COM terminals on the wifi switch (normally open and common).

after that is hooked up and the wire is ran to your terminals on the wifi switch, were gonna hook up our 12v power to the wifi switch, simply put positive with positive and negative with negative, if your leads on the 12v psu aren’t clearly enough marked you can use the multimeter to check, put it on DC voltage setting and touch the two 12v leads while its powered on, if it has a -12.0

instead of 12.0 you switch the leads around and check, what ever the red multimeter lead is on is positive and black is negative when you get a positive reading.

finally connect your wifi module to the EWELINKS app, register your account, then hold the button on the wifi switch for 5 seconds it will change its flashing of the led and you are ready to connect it, once its connected press the button on your phone and bam! should be working! now that its verified its working go ahead and put the wifi switch into the project box and route your wires however you want just make sure you get them back in the right hole.

point to point network bridge between two houses without sharing internet connections

My cousin and i have talked about it for a few years connecting our two networks so we could share information back and forth mostly movies and tv shows, while at the same time not sharing an internet connection. we finally stepped up and decided to do it and here is how.

required supplies:

  • direct bury rated or UV resistant cat5e or cat6 depending if you have to bury it or if it will be exposed to sunlight.
  • two point to point network bridges rated for the distance you need to  travel or more if you want better reception. here’s what we used be sure they support WDS bridge mode
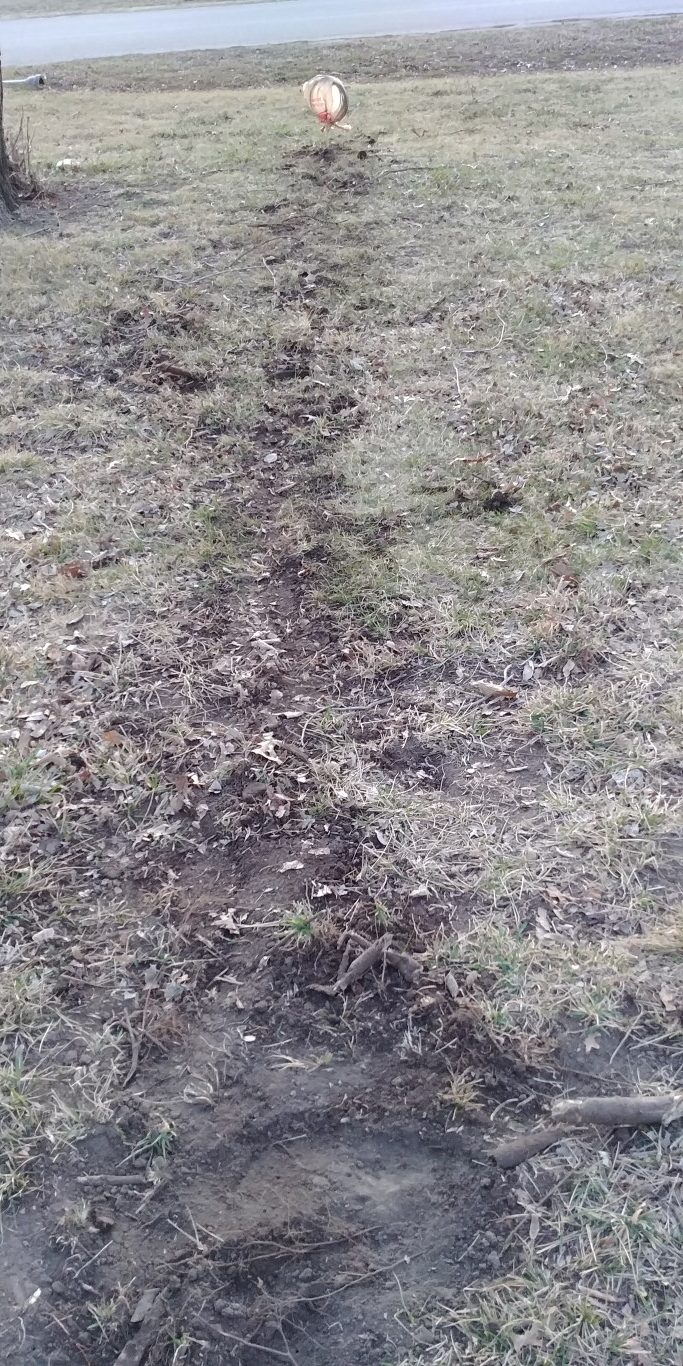
  • trenching tool if there is no LOS from building to building, i just used a manual edger  and just wiggled it back and forth to open the crack up.
  • patch cables to plug your bridge into your pc for initial setup
  • better than average router for my example i will be using a pfsense machine with a quad port gigabit adapter your run of the mill netgear won’t get the job done.
  • a little bit of networking and internet knowledge goes a long way.

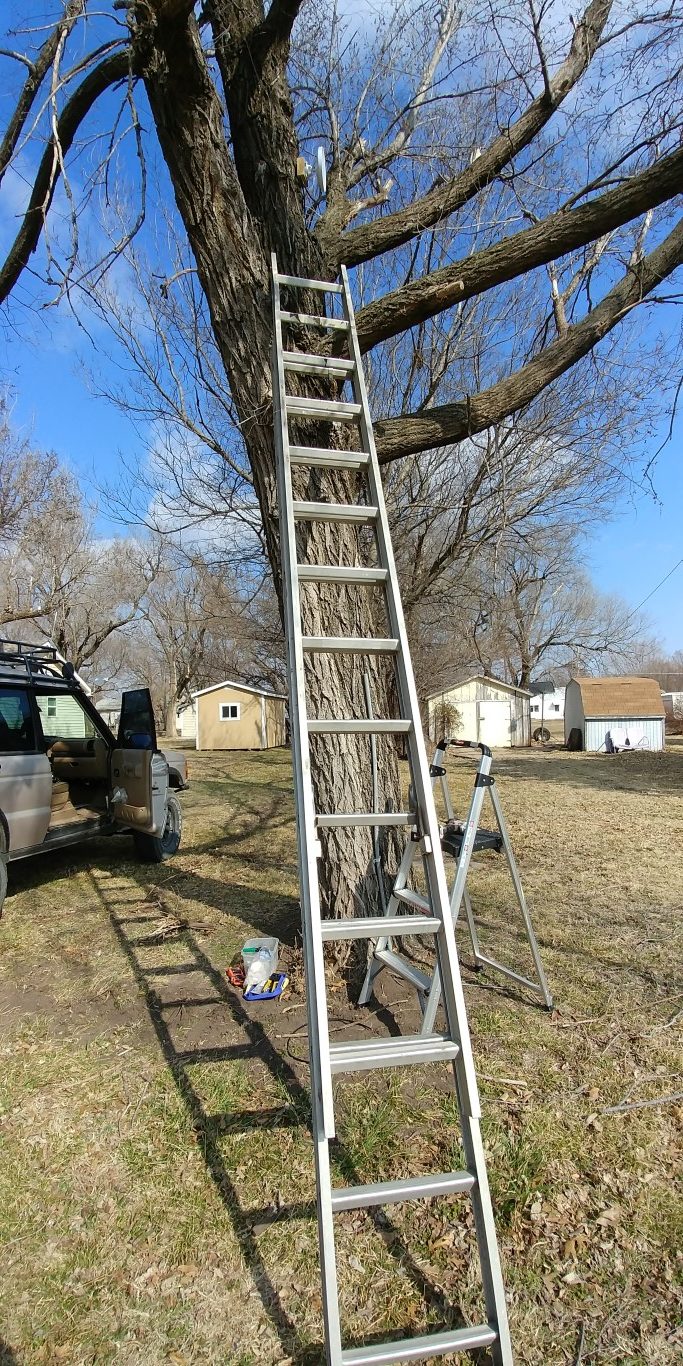
first thing to do is get your  cat5e or cat6 line ran, weather you are going to be installing it on your roof or on a pole out in the yard.

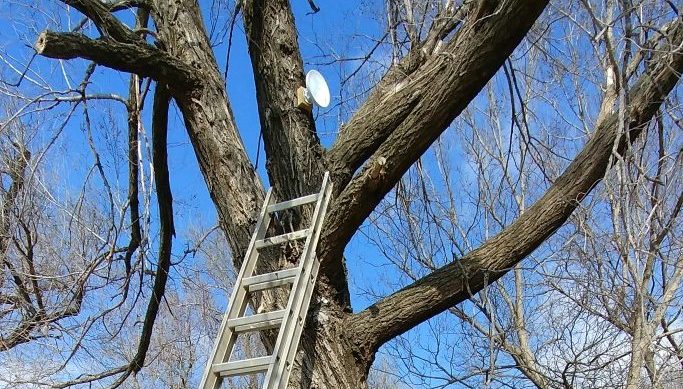
after you have your line ran to where you need it go ahead and get your antenna mounted using the supplied screws and or fasteners, be sure if doing a line of sight installation that the antennas will have enough rotation to be able to align.

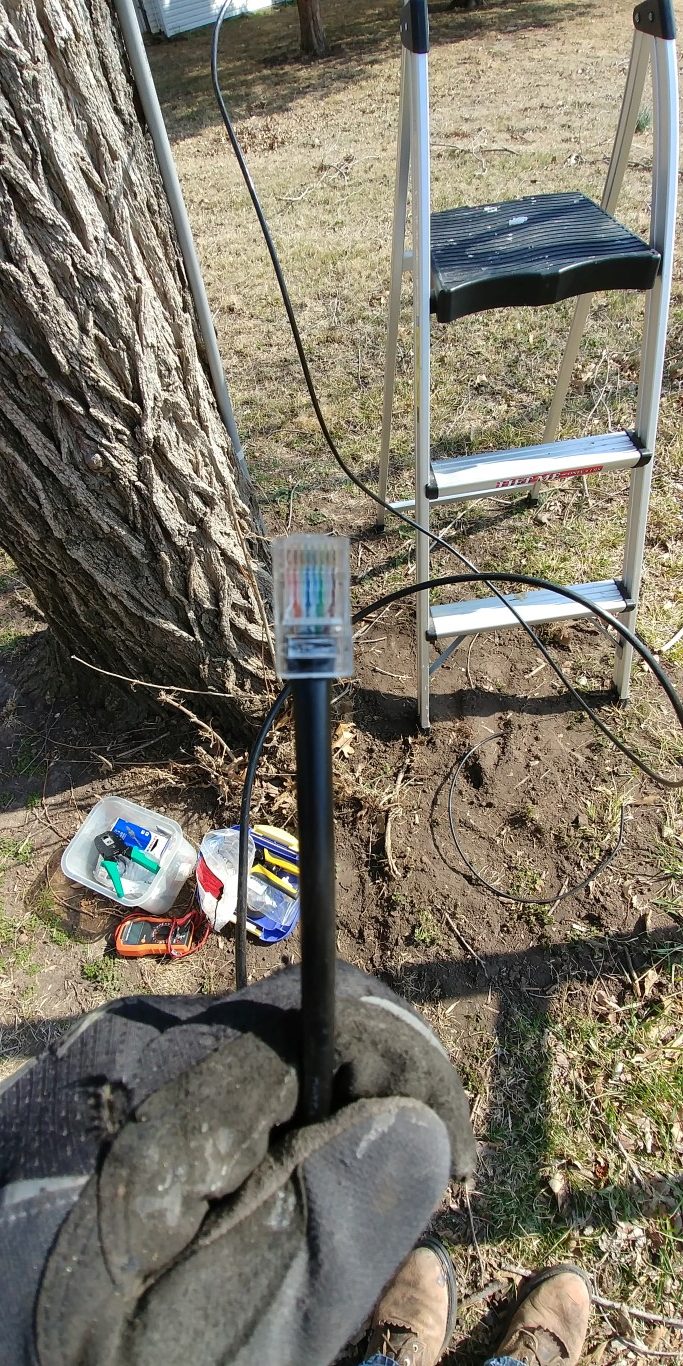
once mounted and you have your cat5e hooked into the lan port hook the other end of the cat5e into the POE injector where its labeled POE , then use your patch cable to go from the poe injector to your computer, and power up the antenna by plugging the PE injector into the wall.

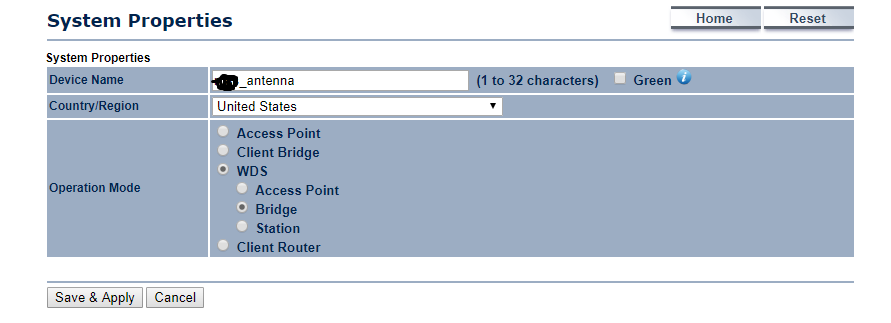
follow the instructions on your antennae guide about how to set them up usually it involves logging into a web gui and changing settings there. When doing this you DO NOT want to use one as an access point that will cause a bunch of headache… trust me we went through that.
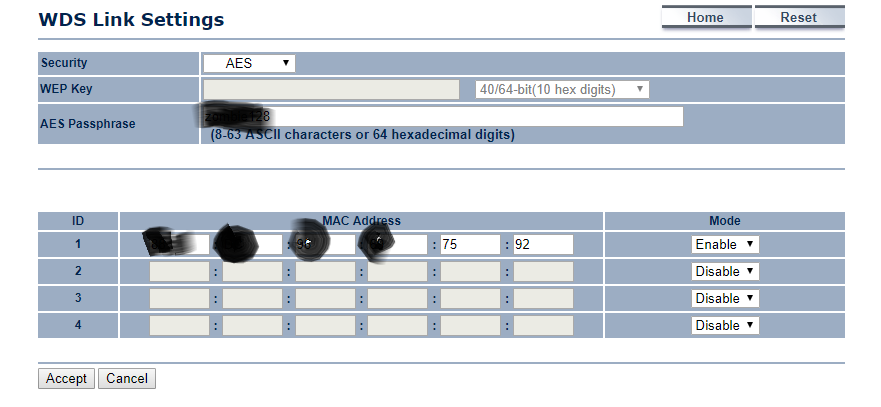
set both devices as a WDS bridge and you will need the MAC address off of each device, put ones mac in the other and vice versa, they each need to have each others mac plus the AES encryption password the same on each antenna.

If you attempt to use one as a bridge and one as a wifi access point it causes a ton of issues later on, this way using WDS makes the connection transparent as though you took an ethernet cable and plugged them directly into each other. another thing to do would be to go into the ip settings and assign them an ip address inside your transit network so you dont lose them in later steps.

ok, now that we have the antennas put up, powered up and linked together lets move on to the routers.  you are going to need 3 ports, one LAN one WAN and one for the transit network. you will want both of your networks on a different subnet but same subnetmask. example mine is 192.168.10.0/24 cousins is 192.168.50.0/24

i will explain how ours is setup but wont go into great detail on how to do it its pretty self explanatory, if you have much experience in pfsense. the WAN and LAN will auto configure when you install pfsense then to add the transit network you go to INTERFACES> (ASSIGN) assign your available nic as an interface, then go back to interfaces at the top and select that new interface usually opt1 by default.  set ipv4 configuration type to static ipv4, then under ipv4 address give your opt1 an ip address for mine i did 192.168.30.1/24 and on my cousins opt1 we assigned it 192.168.30.2/24.

in order to get our networks to talk to eachother you need to

at this point this was our setup

me
lan 192.168.10.1/24
opt1 192.168.30.1 “transit network”
static route 192.168.50.1/24 -> 192.168.30.2

him
lan 192.168.50.1/24
opt2 192.168.30.2 “transit network”
static route 192.168.10.1/24 -> 192.168.30.1

After getting those setup you will want to go to firewall>rules and add a rule in the opt1 tab to allow any traffic to opt1 from any source or any destination and any protocol you will also want to go to the LAN tab and set a rule to allow all from opt1 net.

after that is saved, and done on both ends you should be able to connect the antennas up to the opt1 on each side and have a successful connection!